> ## Documentation Index
> Fetch the complete documentation index at: https://docs-staging-docs-event-stream-action-templates.mintlify.site/llms.txt
> Use this file to discover all available pages before exploring further.
> Learn about the custom token exchange flow.
# Custom Token Exchange Flow
Custom Token Exchange allows applications to exchange an existing security token—referred to as the `subject_token`—for Auth0 access, ID, and refresh tokens by calling the `/oauth/token` endpoint, in accordance with [RFC 8693](https://datatracker.ietf.org/doc/html/rfc8693).
## How it works
The Custom Token Exchange flow is governed by a single, dedicated [Custom Token Exchange Action](/docs/customize/actions/explore-triggers/signup-and-login-triggers/custom-token-exchange-trigger), which is uniquely selected based on the incoming `subject_token_type` parameter, as configured in a [Custom Token Exchange Profile](/docs/authenticate/custom-token-exchange/configure-custom-token-exchange).
 As a prerequisite for the flow, you must define a [Custom Token Exchange Profile](/docs/authenticate/custom-token-exchange/configure-custom-token-exchange#create-custom-token-exchange-profile) that maps a specific `subject_token_type` to the Action that will handle the requests.
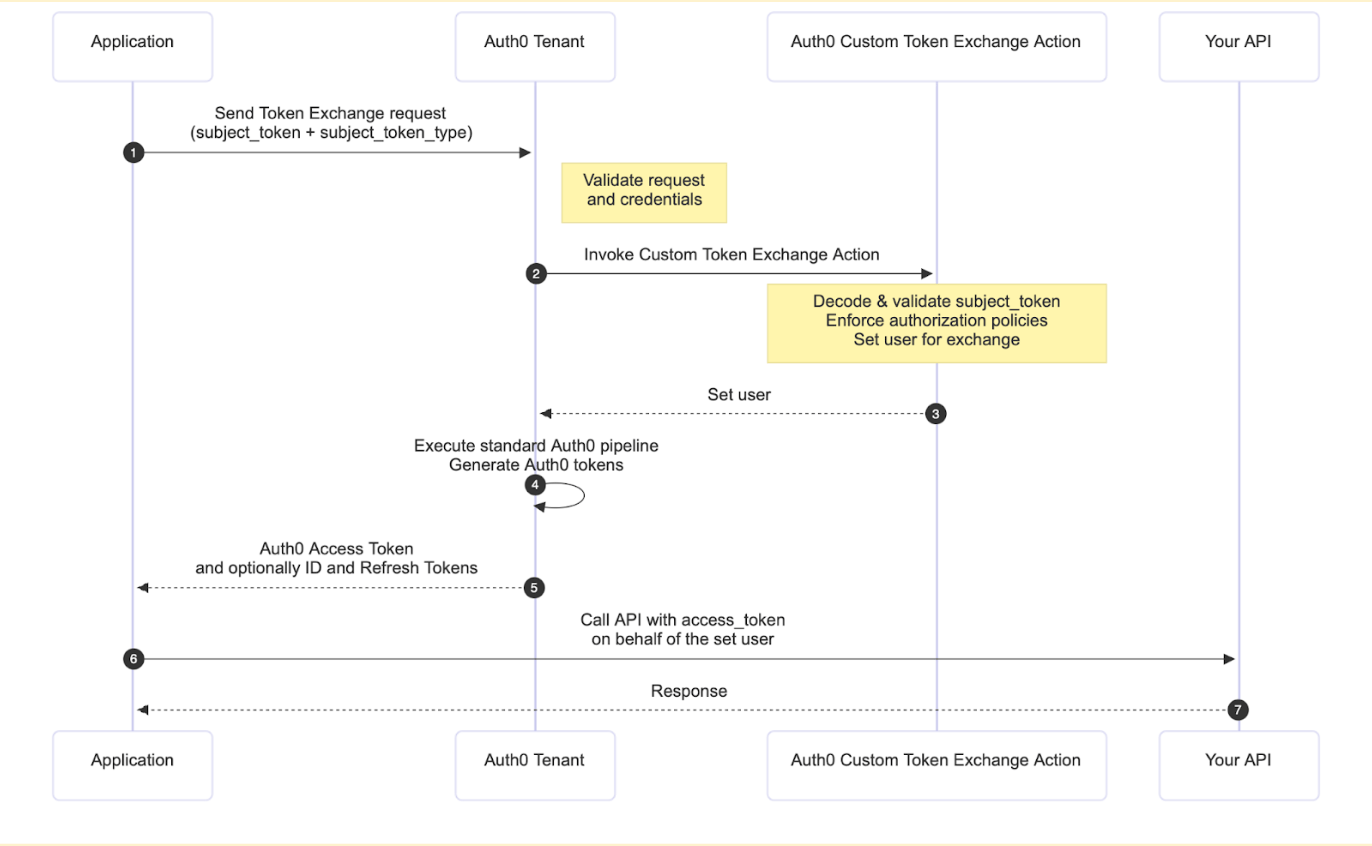
When the Custom Token Exchange flow is triggered:
1. The application sends a `POST` request to the `/oauth/token` endpoint with the security token to be exchanged (the `subject_token`) and its corresponding `subject_token_type`. The request can optionally include an `actor_token` and `actor_token_type` to identify a principal acting on behalf of the user.
2. Auth0 validates the client request and credentials.
3. The associated Custom Token Exchange Action is executed. Your custom code must decode and validate the `subject_token`, enforce any necessary authorization policies, and set the user for the transaction to approve the exchange. The Action can also set an actor for the transaction via `api.authentication.setActor()`, which results in an `act` claim in the issued tokens that identifies who is acting on behalf of the user.
4. The rest of the standard Auth0 pipeline executes to generate an Auth0 access token and optionally an ID token and refresh token for the set user.
5. The requesting application can then use these newly issued tokens to securely call APIs on behalf of the user that was set in the Action.
## Get started
To use Custom Token Exchange, you need to [create a Custom Token Exchange Profile](/docs/authenticate/custom-token-exchange/configure-custom-token-exchange#create-custom-token-exchange-profile). The general workflow involves three main configuration steps followed by your API call:
1. [Create and deploy an Action](/docs/authenticate/custom-token-exchange/configure-custom-token-exchange#create-action-for-the-profile) that will contain the logic to control the token exchange. In this Action, write the custom code logic to:
* Securely decode and validate the incoming `subject_token`.
* Perform any required authorization steps for the transaction.
* Set the corresponding user for the transaction using the available methods in the [Custom Token Exchange Actions API Object](/docs/customize/actions/explore-triggers/signup-and-login-triggers/custom-token-exchange-trigger/custom-token-exchange-api-object).
2. [Create the Custom Token Exchange Profile](/docs/authenticate/custom-token-exchange/configure-custom-token-exchange#create-custom-token-exchange-profile) in your tenant. The profile establishes a one-to-one mapping between a specific `subject_token_type` you will use in your requests and the Action you just created.
3. [Enable Custom Token Exchange for your application](/docs/authenticate/custom-token-exchange/configure-custom-token-exchange#enable-custom-token-exchange-for-your-application).
Once you’ve created the Custom Token Exchange Profile, you are ready to:
1. Call your API: You can now make a `POST` request to the `/oauth/token` endpoint with the necessary parameters, including the `subject_token` and the `subject_token_type` that corresponds to your configured profile. To learn more, read [Call your API using Custom Token Exchange](/docs/get-started/authentication-and-authorization-flow/token-exchange-flow/call-your-api-using-the-custom-token-exchange-flow).
## Learn more
* [Custom Token Exchange](/docs/authenticate/custom-token-exchange)
* [Example Use Cases](/docs/authenticate/custom-token-exchange/cte-example-use-cases)
* [Configure Custom Token Exchange](/docs/authenticate/custom-token-exchange/configure-custom-token-exchange)
As a prerequisite for the flow, you must define a [Custom Token Exchange Profile](/docs/authenticate/custom-token-exchange/configure-custom-token-exchange#create-custom-token-exchange-profile) that maps a specific `subject_token_type` to the Action that will handle the requests.
When the Custom Token Exchange flow is triggered:
1. The application sends a `POST` request to the `/oauth/token` endpoint with the security token to be exchanged (the `subject_token`) and its corresponding `subject_token_type`. The request can optionally include an `actor_token` and `actor_token_type` to identify a principal acting on behalf of the user.
2. Auth0 validates the client request and credentials.
3. The associated Custom Token Exchange Action is executed. Your custom code must decode and validate the `subject_token`, enforce any necessary authorization policies, and set the user for the transaction to approve the exchange. The Action can also set an actor for the transaction via `api.authentication.setActor()`, which results in an `act` claim in the issued tokens that identifies who is acting on behalf of the user.
4. The rest of the standard Auth0 pipeline executes to generate an Auth0 access token and optionally an ID token and refresh token for the set user.
5. The requesting application can then use these newly issued tokens to securely call APIs on behalf of the user that was set in the Action.
## Get started
To use Custom Token Exchange, you need to [create a Custom Token Exchange Profile](/docs/authenticate/custom-token-exchange/configure-custom-token-exchange#create-custom-token-exchange-profile). The general workflow involves three main configuration steps followed by your API call:
1. [Create and deploy an Action](/docs/authenticate/custom-token-exchange/configure-custom-token-exchange#create-action-for-the-profile) that will contain the logic to control the token exchange. In this Action, write the custom code logic to:
* Securely decode and validate the incoming `subject_token`.
* Perform any required authorization steps for the transaction.
* Set the corresponding user for the transaction using the available methods in the [Custom Token Exchange Actions API Object](/docs/customize/actions/explore-triggers/signup-and-login-triggers/custom-token-exchange-trigger/custom-token-exchange-api-object).
2. [Create the Custom Token Exchange Profile](/docs/authenticate/custom-token-exchange/configure-custom-token-exchange#create-custom-token-exchange-profile) in your tenant. The profile establishes a one-to-one mapping between a specific `subject_token_type` you will use in your requests and the Action you just created.
3. [Enable Custom Token Exchange for your application](/docs/authenticate/custom-token-exchange/configure-custom-token-exchange#enable-custom-token-exchange-for-your-application).
Once you’ve created the Custom Token Exchange Profile, you are ready to:
1. Call your API: You can now make a `POST` request to the `/oauth/token` endpoint with the necessary parameters, including the `subject_token` and the `subject_token_type` that corresponds to your configured profile. To learn more, read [Call your API using Custom Token Exchange](/docs/get-started/authentication-and-authorization-flow/token-exchange-flow/call-your-api-using-the-custom-token-exchange-flow).
## Learn more
* [Custom Token Exchange](/docs/authenticate/custom-token-exchange)
* [Example Use Cases](/docs/authenticate/custom-token-exchange/cte-example-use-cases)
* [Configure Custom Token Exchange](/docs/authenticate/custom-token-exchange/configure-custom-token-exchange)